MKhost Knowledgebase
Need help? Search or browse our large collection of articles on a variety of topics including hosting, domains, emails and more .
SSH access, keys and connectivity
How to connect to your hosting account via SSH
SSH gives you access to your hosting account's command line.
This guide shows you how to create an SSH key, add it to MKhost Portal, and connect to your hosting account. Follow the instructions for your operating system.
Before you begin
You need access to MKhost Portal and an active cPanel hosting service.
Windows — PowerShell
If you use Windows, enter the commands inWindows PowerShellorPowerShell. You do not need to selectRun as administrator.
Start withWindows setup, continue with theMKhost Portal steps, then finish withconnecting on Windows.
macOS and Linux — Terminal
If you use macOS or Linux, enter the commands inTerminal.
Start withmacOS and Linux setup, continue with theMKhost Portal steps, then finish withconnecting on macOS and Linux.
Follow only the section for your operating system. The MKhost Portal steps are the same for everyone.
Windows — setup in PowerShell
1. Open PowerShell and check whether SSH is available
- On Windows, open theStartmenu.
- TypePowerShell.
- OpenWindows PowerShellorPowerShell. You do not need to selectRun as administrator.
- You will see a command prompt that starts with and ends with . Enter the Windows commands from this guide in this window.
- Enter the following command and press Enter:
If an OpenSSH version is displayed, continue to the next step. If you see a message saying that is not recognized as a command, install the WindowsOpenSSH Clientcomponent, then reopen PowerShell.
2. Create a folder for your SSH files
In PowerShell, enter the following two commands one at a time. Press Enter after each command:
The first command creates the folder if it does not exist. If it already exists, its contents are preserved. The second command switches to that folder.
automatically refers to your Windows user folder. Do not replace it with your name. For example, for a user named ana, the path would be .
3. Generate an SSH key
- In the same PowerShell window, enter:
- WhenEnter file in which to save the keyappears, press Enter without typing anything. This accepts the displayed default path, which ends with .
- If you see anOverwriteprompt, type and press Enter. This stops key generation without overwriting your existing key. You can use the existing key or run the command again and choose a different filename.
- AtEnter passphrase, enter a passphrase to protect your private key. We recommend setting a passphrase. No characters or asterisks will appear as you type — this is normal.
- Press Enter. AtEnter same passphrase again, enter the same passphrase again and press Enter. If you leave the passphrase blank, your private key will not be protected by a passphrase.
- Once the key has been generated successfully, you will seeYour identification has been savedandYour public key has been saved.
Check the filenames:
If you accepted the default filename, you should see:
- — your private key. Do not share it or upload it to Portal.
- — your public key, which you will add to Portal.
The folder may also contain other files from previous connections.
If you want to use a different filename
At the prompt asking where to save the key, you can enter a name such as . Since you switched to the folder in the previous step, and will be created there.
Use the public key file in Portal, and set both lines in the SSH configuration to .
If you run the command from another folder and enter only a filename without a full path, the files will be saved in that folder.
If you already have an Ed25519 key, you do not need to create a new one. Use its file in Portal and the path to the matching private key in the configuration.
4. Copy your public key
- In PowerShell, enter:
- If your key has a different filename, replace with the name of your public key file, such as .
- A long line starting with will appear. Select the entire line and copy it with Ctrl+C. If it wraps across several lines on screen, copy all of its contents.
The comment at the end, such as , is only a label. You can keep it or remove it. Do not change or the long string that follows it.
Important:use only the file with the extension when adding a key to Portal. Do not copy the contents of your private key.
Continue tostep 5 — MKhost Portal.
macOS and Linux — setup in Terminal
1. Open Terminal and check whether SSH is available
On macOS, openTerminalusing Spotlight or go toApplications → Utilities → Terminal. On Linux, open theTerminalapplication from your applications menu.
Enter the following command and press Enter:
If an OpenSSH version is displayed, continue to the next step. If the command is unavailable, install the OpenSSH client for your operating system.
2. Create a folder for your SSH files
In Terminal, enter the following commands one at a time. Press Enter after each command:
The first command creates the folder if it does not exist and preserves its existing contents. The second restricts access to the folder to your user account, and the third switches to that folder.
refers to your home folder. Do not replace it with your name.
3. Generate an SSH key
- In the same Terminal window, enter:
- WhenEnter file in which to save the keyappears, press Enter without typing anything. This accepts the default path, which ends with .
- If you see anOverwriteprompt, type and press Enter. This stops key generation without overwriting your existing key. You can use the existing key or run the command again and choose a different filename.
- AtEnter passphrase, enter a passphrase to protect your private key. We recommend setting a passphrase. No characters or asterisks will appear as you type — this is normal.
- Press Enter. AtEnter same passphrase again, enter the same passphrase again and press Enter. If you leave the passphrase blank, your private key will not be protected by a passphrase.
- Once the key has been generated successfully, you will seeYour identification has been savedandYour public key has been saved.
Check the filenames:
- — your private key. Do not share it or upload it to Portal.
- — your public key, which you will add to Portal.
The folder may also contain other files from previous connections.
If you want to use a different filename
At the prompt asking where to save the key, you can enter a name such as . Since you are in the folder, and will be created there.
Use in Portal, and set both lines to . Also adjust the commands below to match your key's filename.
If you run the command from another folder and enter only a filename without a full path, the files will be saved in that folder.
If you already have an Ed25519 key, you do not need to create a new one. Use its file in Portal and the path to the matching private key in the configuration.
4. Copy your public key
- In Terminal, enter:
- If your key has a different filename, replace with the name of your public key file, such as .
- A long line starting with will appear. Select the entire line and copy it. On macOS, useCommand+C; on Linux, use theCopyoption in Terminal. If it wraps across several lines on screen, copy all of its contents.
The comment at the end, such as , is only a label. You can keep it or remove it. Do not change or the long string that follows it.
Important:use only the file with the extension when adding a key to Portal. Do not copy the contents of your private key.
Continue tostep 5 — MKhost Portal.
MKhost Portal — for all operating systems
5. Open the SSH access section in Portal
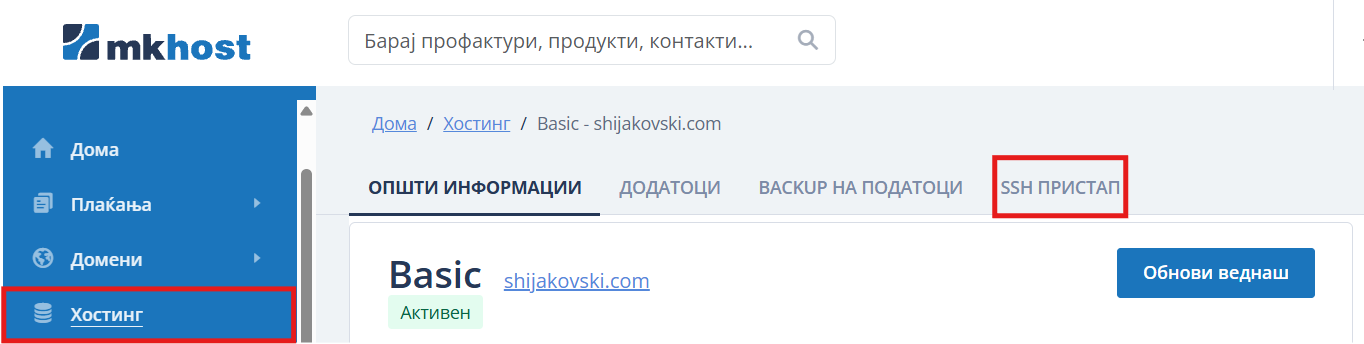
- Log in toMKhost Portal.
- In the left menu, clickHosting.
- Open the hosting service you want to connect to.
- Open theSSH ACCESStab.
6. Add your public key to your profile
- In theProfile SSH keyssection, enter a name of your choice in theKey namefield, such asWork laptop.
- In thePublic key (Ed25519)field, paste the entire public key line you copied.
- Instead of pasting the key, you can selectUpload .pub fileand upload from your folder. If you used a different filename, select the matching file.
- ClickAdd key.
- Check that the key appears in the list of saved keys.
The key is saved to your user profile. You can select it again for another hosting service.
7. Select your key and enable SSH
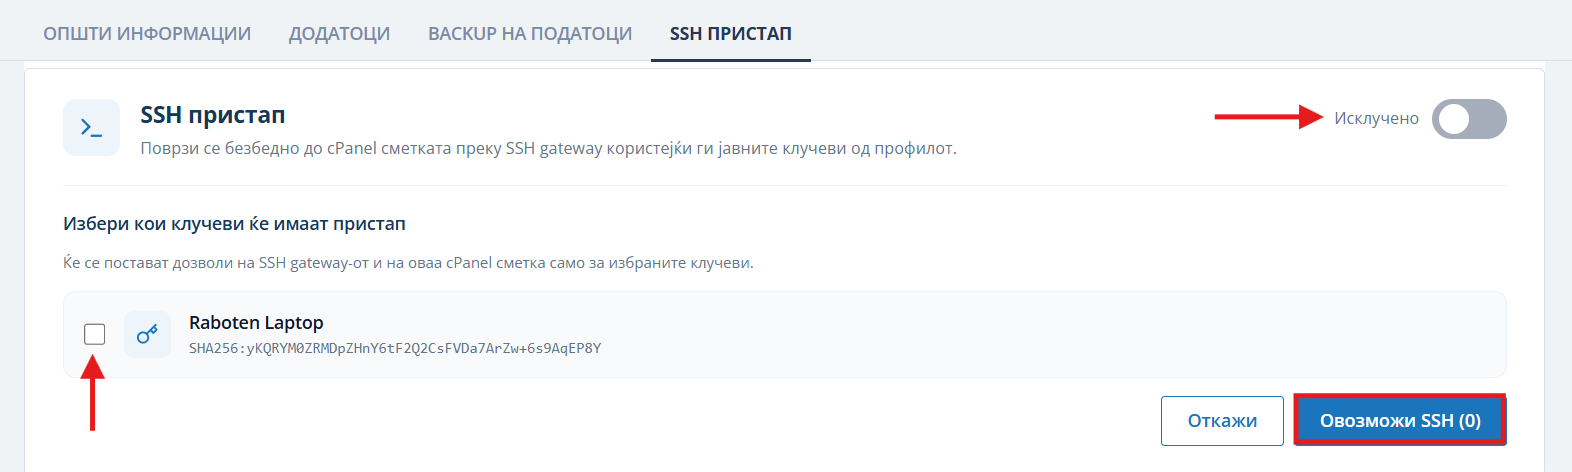
- Click the button in the top right to open the key selection panel.
- UnderSelect which keys will have access, select the checkbox next to your key.
- When one key is selected, the button should showEnable SSH (1). The number indicates how many keys are selected. If it shows(0), select a key first.
- ClickEnable SSH (1).
- Wait for activation to complete.
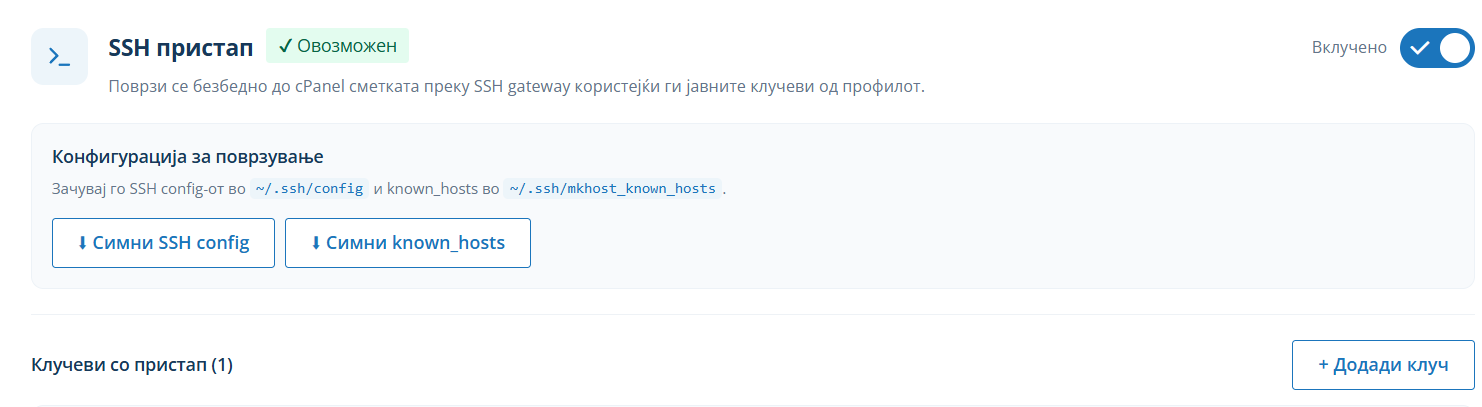
8. Download the SSH files
- Download both files:SSH configandknown_hosts.
- Open yourDownloadsfolder, or the folder where your browser saved the downloads.
Continue with the file setup and connection instructions for your system:Windows — PowerShellormacOS and Linux — Terminal.
Windows — file setup and connection
9. Check the path to your private key
- Find the downloaded SSH configuration in Downloads and open it withNotepad. UseOpen withif necessary.
- The configuration contains two blocks that start with . One alias ends with , and the other does not.
- Find the line in each block. If you accepted the default key filename, both lines should be:
- If you used a different filename, enter that instead. For example, for a private key named , enter in both blocks.
- Leave the remaining settings as generated by Portal, including , , , , , , and .
- If you made changes, clickFile → Save.
Important:specifies the path to your private key, without the extension. Both blocks must point to the matching private key on this computer.
10. Place the files in the correct folder
- In PowerShell, enter the following command to open the folder in File Explorer:
- Your private and public keys should already be in this folder.
- If you do not have an existing SSH configuration, copy the downloaded configuration into this folder and make sure the file is named exactly , without a extension.
- Check the path specified in in the downloaded configuration. Save the downloaded server host key file at that path, using the exact filename specified.
For example, if the configuration contains:
the downloaded server host key file must be saved in your folder as , without a extension. Do not assume that the downloaded filename always matches the filename expected by the configuration.
If you already have a config file or a server host key file
Do not replace existing files without preserving their contents.
- Back up your existing file. Open it with Notepad and add the two new blocks before general rules such as . If the same aliases already exist, update their blocks instead of creating duplicates.
- If the file specified in already exists, back it up and add the new server entries while preserving the existing ones. If existing entries for the same servers differ from the downloaded entries, check with support before replacing them.
11. Find your hosting alias
- Open the file with Notepad.
- Find the line whose alias does not end with . For example:
- Your alias is the text after . In this example, it is . SSH uses this short name to find the connection settings in .
In the command below, replace the example with your exact alias. Do not add or connect directly to the IP address. The gateway forwards the connection to your hosting account and does not provide its own terminal.
12. Connect via SSH
- Return to PowerShell. You should see the command prompt.
- Enter the command using your hosting alias:
- IfEnter passphrase for keyappears, enter the passphrase you set when generating the key and press Enter. This is not your Portal password. No characters will appear as you type.
Once connected successfully, you can enter commands on your hosting account.
To end the SSH session and return to PowerShell, enter:
macOS and Linux — file setup and connection
9. Check the path to your private key
- Open the downloaded SSH configuration with a plain text editor. On macOS, if you use TextEdit, select plain text mode.
- The configuration contains two blocks that start with . One alias ends with , and the other does not.
- Check the line in both blocks. For the default filename, it should be:
- If you used a different filename, such as , set in both blocks.
- Leave the remaining settings as generated by Portal, including , , , , , , and .
- Save your changes.
Important:specifies the path to your private key, without the extension. Both blocks must point to the matching private key on this computer.
10. Save the files and set their permissions
- If you do not have an existing SSH configuration, save the downloaded configuration as , without a extension.
- If already exists, back it up and add the two new blocks before general rules such as . If the same aliases already exist, update their blocks instead of creating duplicates.
- Save the downloaded server entries at the path specified in . For example, if it specifies , save them in a file with that name, without a extension.
- If the server entry file already exists, back it up and add the new entries while preserving the existing ones. If existing entries for the same servers differ from the downloaded entries, check with support before replacing them.
- In Terminal, set the permissions using the following command. This example applies if your private key is named and the file specified in is named :
If you use different filenames or paths, adjust the command accordingly. Do not assume that the downloaded server host key filename always matches the filename expected by the configuration.
11. Find your hosting alias
- Open the file with a plain text editor.
- Find the line whose alias does not end with . For example:
- Your alias is the text after . In this example, it is . SSH uses this short name to find the connection settings in .
In the command below, replace the example with your exact alias. Do not add or connect directly to the IP address. The gateway forwards the connection to your hosting account and does not provide its own terminal.
12. Connect via SSH
- Return to Terminal and enter the command using your hosting alias:
- IfEnter passphrase for keyappears, enter the passphrase you set when generating the key and press Enter. This is not your Portal password. No characters will appear as you type.
Once connected successfully, you can enter commands on your hosting account.
To end the SSH session and return to your local Terminal, enter:
Windows commands using , , and are not used in Terminal on macOS and Linux.
Deleting an SSH key from your profile
- In the saved SSH keys section, find the key you want to remove.
- Check which services use it.
- SelectDeletefor that key.
- Read the confirmation message and confirm the deletion if you want to continue.
Deleting a key from your profile revokes access through that key on all services to which it was assigned. When the change is applied, existing SSH sessions using that key are also terminated.